Telechron Rotor Date Codes:
Information taken from Telechronclock.comLate 1920s - 1933:
Date code was simply Month (1-2 digits),Year (2 digits) (ex: 6 30 = June 1930)
Most common rotor was the B-2 w/ brass housing
~1933 - 1940:
Date code was Year (1 digit), Month (1-2 digits) (ex: 79 = July, 1939)
The most common rotor models in the era were F, H-3 with nickel/brass housings and B-2)
1941 - 1949:
Same as above (However, you must know the style of rotor to properly date them) (ex. 73 = March, 1947)
1950 - 1990:
Date code was Year (1 digit), Month (1-2 digits), Decade (1 digit) (ex: 385 = August 1953)
Telechron Rotor Types (No Special Types):
B Rotor:
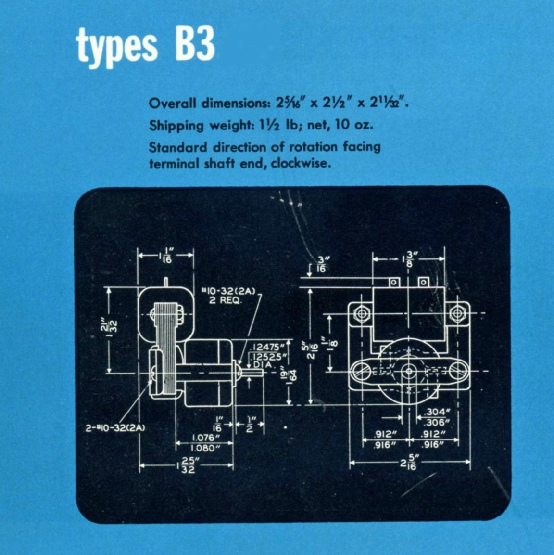
The Telechron B clock rotor series made it's debut in the 1920's and stayed a part of the General Electric/Telechron clock lineup through the 40's.
The standard B series rotor was the B-2 which turned at 1 RPM and has a 9 tooth gear at the bottom of the output shaft. The oldest Telechron B-2's had copper housings. Housings eventually switched to brass, then nickel/brass (like the oldest H-3 rotors), and finally aluminum (when they were sold for replacement in the 60's, see this photo on Dave's site).
H Rotor:
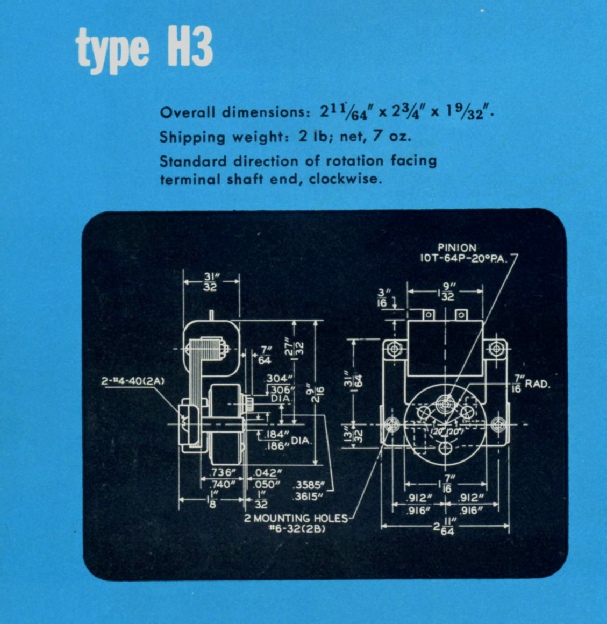
The Telechron H clock rotor series made it's debut in the 1930's and became the workhorse of the General Electric/Telechron clock lineup through the 60's.
The standard H series rotor was the H-3 which turned at 3.6 RPM and has a 10 tooth gear. The oldest Telechron H-3's had nickel/brass housings with bronze bushings. Housings eventually switched to copper and finally lower cost aluminum (also lower quality internal parts).
S Rotor:
The Telechron S clock rotor series made it's debut in the 1954 and became found in many clocks of the General Electric/Telechron clock lineup through the 60's and 70's.
The standard S series rotor was the S-1 which turned at 3.6 RPM and has a 10 tooth gear (some specialized models have 15-pin gears and are marked S-4). All Telechron S-1's had low cost aluminum (also lower quality internal parts compared to previous rotors).
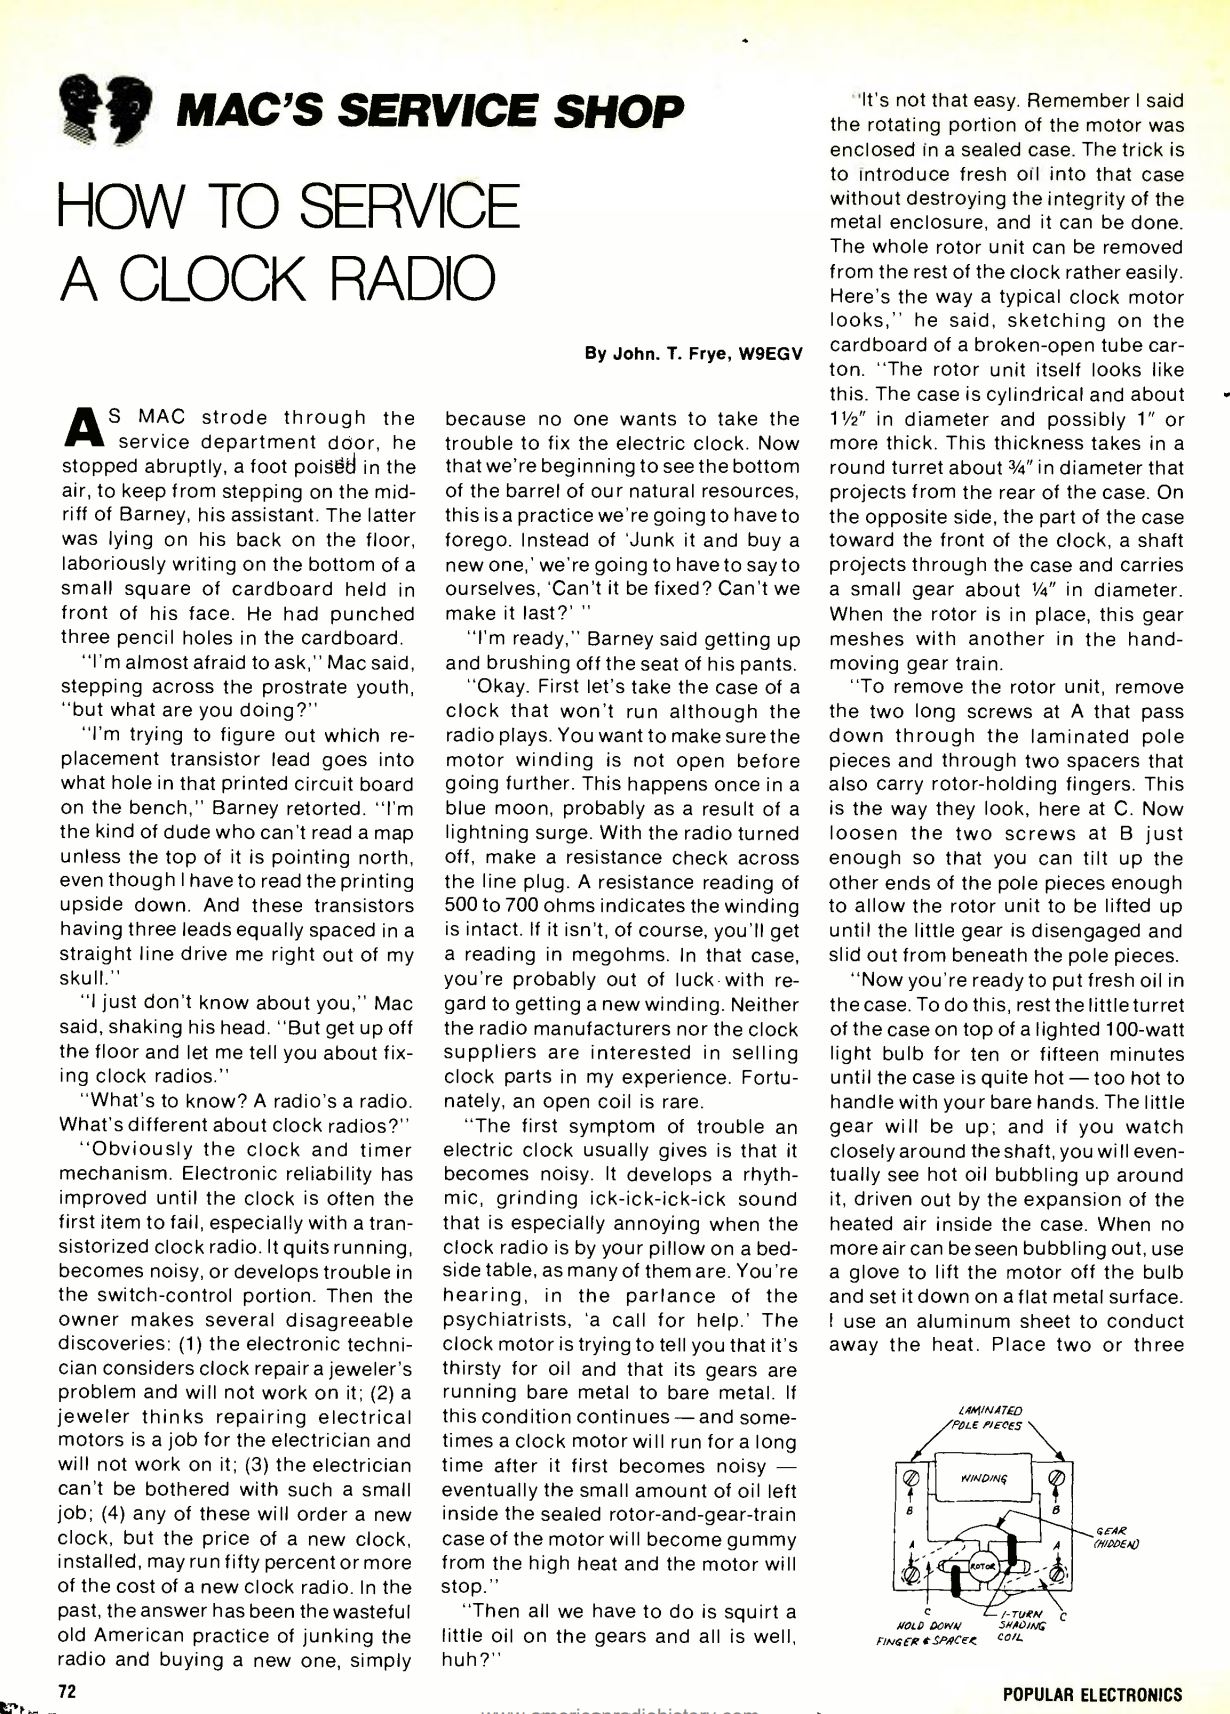
Rotor Servicing:
Information taken from nutone.neocities.orgClick Images to Enlarge
Notes for the above method:
Where to Buy Rotors:
Telechron/General Electric/Timex has not made rotors since 1992, and they destroyed their rotor making machines (or so I've seen on the internet). However, you can still buy them. Here's a list of suppliers:
- Timesavers: standard S rotors here for $19.50 per rotor
- Ronell Clock Co.: S-4 type S rotors here for $1 per rotor
- Telechron Clock LLC: B rotors, H rotors, S rotors, and more here, for various prices (depending on options)
Remember to look at the model of your existing rotor so you can buy the proper one.
Other Information & How-To Stuff
Q & A's
Q: My clock isn't listed in the database. Do you have any other places to find information?
A: I do have the 1960-1961 catalog for General Electric. You can view it here. You may also want to visit Clockhistory.com, which you can find on the links page. However, the database does not list Revere chiming clocks
Q: I can't get the set-knob off, what do I do?
A: The majority of General Electric & Telechron clocks have REVERSE-threaded set knobs (if there is an arrow showing the direction to turn the hands, turn it the opposite way). The exceptions to these are clocks made from 1917-1932. When you take the knob off, protect it with a cloth, leather glove, etc. so that you don't chew up the knob.
Q: I need to replace the cord. What kind should I use?
A: Use the below table for information based on the wattage rating on the clock. However, most clocks will be A-OK with an 18 gauge cord.
| Wire Gauge | Normal Load | Capacity Load |
|---|---|---|
| 18 | 5 Amps (600W) | 7 Amps (840W) |
| 16 | 8.3 Amps (1000W) | 10 Amps (1200W) |
| 14 | 12.5 Amps (1500W) | 15 Amps (1800W) |
Q: Can I use a different rotor than the original?
A: The answer is sometimes. Use the below table for more information. If the information can't be found, use the same type of rotor.
| Rotor | Replacement |
|---|---|
| B | click here |
| F | If it has built in standoffs, use H-3 |
The Ten Commandments of Telechron Repair:
Taken from hereI: The Coil - Don't mess with the coil and, FOR SURE, don't flex, bend, or otherwise stress the leads comings out of the coil. Let those leads keep their natural shape and direction. Accomodate your new wiring to keep these leads the way you found them. On modern coils with tabs, use a soldering iron to gently remove the old leads when replacing the cord. Be very careful with the tabs on the coil. Undue stress can cause the coil paper to unwind and permanently damage the coil.
II: Rotor - Never use a pliers to try and get the rotor gear working on a jammed rotor.
III: Case - Don't over polish Bakelite thinking you are going to bring back that OEM mirror finish, only to lift your rag and find your pride and joy is now hairy because you've exposed the filler material! Late model plastic wall clocks will dissolve no matter what you use on them. Stripper, crazy glue, acrylic, even polishing them is dangerous as the surface may scratch and/or melt.
IV: The Dial/Face - Each dial is a unique example to be restored, or left alone. A brightened and cleaned dial enhances the aesthetics. Spending much more patient detail time is worth the effort. Assess the condition, try attempts on the edges first, water/swabs work best initially to clean and brighten the dial. Beware, it is easy go beyond the "peak" and then the oops start, numerals wash off, the dial paint smears and paint chips lift off. Doing less, can be best. Always handle a radium numeral dial as little as possible, and DO NOT try to do ANY cleaning or restorative work on a radium numeral dial. Finally, Don't start cleaning any dial you aren't prepared to say goodbye to.
V: Bezel Tabs - When you remove a bezel, don't use all the tabs. Only open half, slip movement out, and then back in. Save some from metal fatigue for future use. Once they're gone, they're gone. Always ensure that all hands clear each other before re-assembling the clock. Also make sure the hands clear both the glass and the dial face. Do this with the clock in its normal running position. (This is especially the case for large wall clocks where the hands may clear on the bench but interfere when hung on the wall). Also make sure that the hour hand is perfectly aligned to an hour mark when the minute hand is at 12. Make sure the minute and second hand are aligned.) Make sure the alarm hand is properly set. One final assembly...one final bending of the tabs.
VI: Knobs - Thou shalt not torque knobs to the point that they break off during removal. They may be left hand threaded. Neither shalt thou chew up your knobs and shafts with steel tools but protect them with leather during removal.
VII: Cord - Make sure the cord is restrained/attached/secured inside the case. If not then it could break away from the coil or short out and cause a fire. For wall clocks, if you aren't running it , and want the chord still attached, wrap it around the inside of the clock movement so it doesn't show, and then put back cover on. Unless you have a detachable plug, ALWAYS remember to thread the cord through the case BEFORE soldering to the connections on the coil!
VIII: Lubrication - Any place where a metal pinion, shaft or rod is mounted in a hole in a plate should be lubricated with a microscopic drop of good clock oil. Gear teeth, however are NEVER lubricated in any way. And keep any and all lubricants away from the dial at all cost.
IX: Parts - Buy Parts Clocks at every chance.
X: Thou shalt not convert these clocks to quartz.
Telechron Alarm Features (Over the Years):
- lighted dials (with and without dimmer)
- translucent dials (with and without dimmer)
- luminous numbers
- 24-hour alarm
- front shut off
- buzzer alarm (no bell)
- clock radio
- wall mounted alarm (to keep you from knocking it off the nightstand every AM)
- flasher alarm (flashed your table lamp on and off to wake you
- switch alarm (turned on any appliance you wished to wake you)
- Control-A-Tone knob (adjusted alarm loudness)
- insistent alarm (you know my feelings on this)
- automatic alarm (resets itself during the day or can be disabled)
- alarm indicator light (to let you know if alarm is set)
- snooze alarm
- tune alarm (played a little song to wake you)
- day-by-day alarm (automatic alarm would enable itself variably by day of the week)
Telechron & GE Parts Sheets
| Model | Download |
|---|---|
| 7H140 & 7HA140 | click here |
| F | If it has built in standoffs, use H-3 |
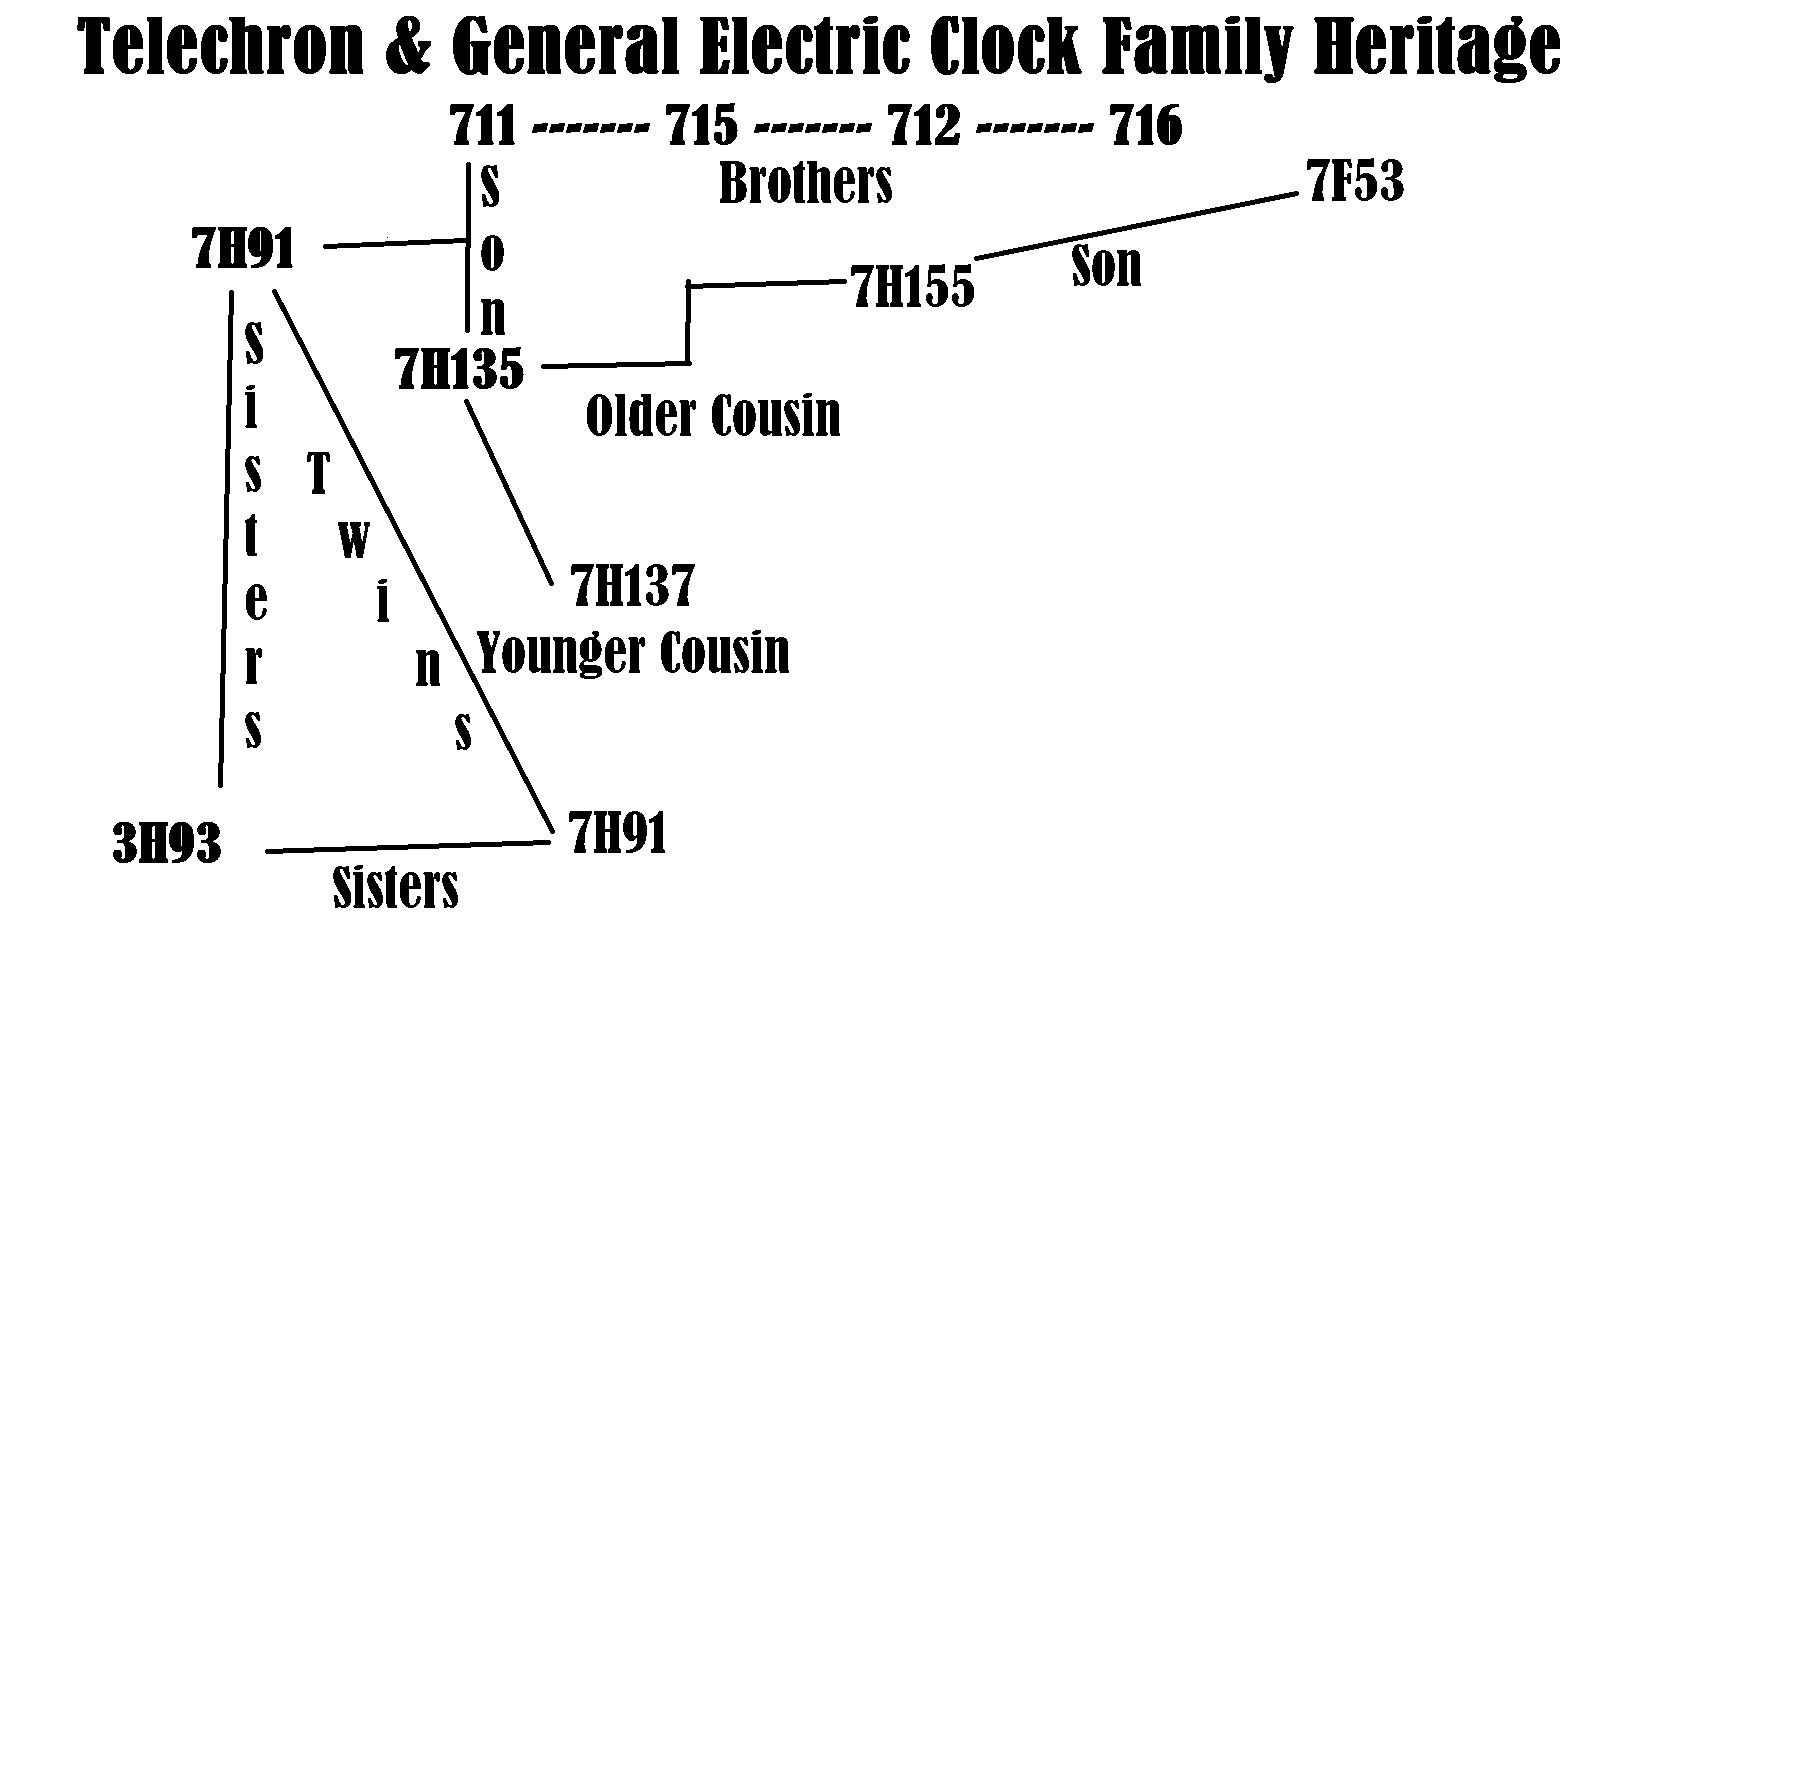
Telechron Design Family Tree
If you can make a better or longer family tree, submit it to me at kwan_nick@aol.com or here.
Telechron/GE Companion Models
Below is a table showing models of companion clocks.
| Model | Companion |
|---|---|
| 7H07 | 7H04 |
| 2H18 | 2H17 |
| 7H197 | 7H216 |
![]()